Welcome to the eighth article in this series which has been examining the design and implementation of a computer controlled train set. It seems as though we've come a long way on this journey already and indeed we have. Earlier articles have explored some of the practical issues of model railroad electrical design, the circuit for the train controller and its PC interface, construction and testing and last month, how to configure the example train controller software for your particular layout. In this instalment, we'll look at how to use the example software waiting for the next and final article in the series to study the detail about how the software works.
If you've managed to successfully design your layout and edit the config.h file as described last month, you should be ready to compile and test your code. But to satisfy yourself that everything has downloaded and installed correctly onto your computer, you should first try to compile and run the unmodified software sources that you hopefully saved away.
The easiest way to do this is log into your system as 'root' and from the directory which contains the original (unmodified) train source files, type:
Hopefully, you will have already sorted out any PC configuration problems two months ago when we used the test_ring programme and your PC should therefore respond with:
Depending upon which distribution of Linux you have installed, you may be using a different version of the 'C' compiler and you may see some compiler warning messages. Almost all warnings which may be displayed will be harmless but any error messages are definitely not and you need to stop and sort out the problem now before you proceed further.
The executable which you have just compiled is an example configuration for a system with two train controller cards. If you enter the command 'train' to run the programme, you should be greeted with a number of messages which start something like:
Abort the programme by typing <CTRL>-C. If you got this far, great - you're ready to try to compile your own configuration. If you encountered a problem in compiling or running the unmodified example code, make sure that you've not corrupted the files you downloaded and that you've downloaded all the files. Any system configuration problems should have been identified previously when you built test_ring so if you're still stuck, seek help from a Linux expert.
Looking more closely at some of the messages which are displayed, the first two lines (starting with the word Main) are debugging messages displayed because some of the debugging flags are enabled. The "0.00" indicates that the time of logging was 0.00 seconds after the train programme was launched.
Change back to the directory which contains your modified train configuration files and run 'make' again. Expect to see similar warnings to those that were given above. Error messages are of course another matter.
If the computer complained that it could not find a Makefile, ensure that you have changed into the directory which contains your modified source files, that *all* the files are there and you are logged in as root. If the compiler complained that it could not find the file "controller.h", make sure you created a link to "controller.h" as described last month. You can quickly check for the link by typing 'ls -l controller.h'. The system should respond with something like the following which clearly shows the details:
Perhaps your compiler complained of other errors? Make sure that the link is pointing to the right controllerN.h file. If your layout uses just a single controller card, the link should be towards controller1.h. The example shown above is for a layout which uses two controller cards.
In truth, the most likely cause of error will be that you've mangled the config.h file in some way when you edited it. Did you add the right number of entries within the Block[] array? You might have introduced 'C' syntax errors. The 'C' compiler usually tries to provide a good suggestion about where it thinks that the error is located so study the error message carefully and edit the troublesome file.
If you're not a 'C' expert yet, the simplest way to spot errors in your config.h is to compare your version with the version you downloaded and pay extra attention to the differences you've introduced. Check that you haven't upset the balance of any of the '/*' and '*/' tokens around the debugging flags, that all your curly brackets match up with each other and are in the correct places. Perhaps you have forgotten to include a comma somewhere within the Block[] array, or have included too many commas. Maybe you didn't get all of the fields within the various elements of Block[] in the right order or you have left one out? Perhaps you have misspelled or not used upper case letters for NORMAL_POLARITY, OPPOSITE_POLARITY, BOUNDARY, OPEN or CLOSED?
If you think that you've tried everything and you're still getting compile errors, you can try resorting to the unmodified config.h file and then introducing your changes one at a time until you've modified the entire file. Before you reach despair, Don't Panic! Speak with somebody experienced in writing, compiling and debugging the 'C' language and your syntax errors should be fast to find.
Now, when you run the 'train' that you've just compiled (by entering 'train'), you should see something like:
This is good and tells you that you've forgotten to turn on your train set or to connect your parallel port adapter to the PC. Don't worry about the funny numbers. They'll become useful when you want to start hacking into the example code and want to debug your changes.
If you've made a logical error in defining your Block[] structure, it's possible that the train programme will detect this and complain about it when you ran it. An example of this is:
Hopefully, the nature of the problem will be clear and the corrective action self explanatory.
Now it is time to permanently wire your train set to the train controller card and connect everything to the PC. If you have more than one train controller card, this is a lot more complex than it sounds because there is plenty of possibility for getting the wires confused, the East connectors interchanged with the West or getting the train controller cards out of the correct sequence.
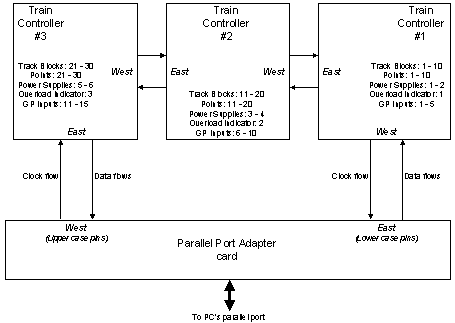
Figure 1 Connecting the train controller cards to the PC
Figure 1 shows an example of how three train controller cards should be connected to the PC. The important points to note are that firstly, one card's East connector always goes to the adjacent card's West connector and vice versa and secondly, the East connector on the parallel port interface card goes to the lowest numbered train controller card.
Now its time to run train again with your train set connected. If train still complains that the ring is not working, check with the test_ring programme to make sure that the ring really is communicating. If test_ring finds no problem, check that you've linked the correct controllerN.h file into the train programme. The train programme is hard wired (in controllerN.h) to expect to see a ring of a certain size and if the number of train controller cards does not match this expected value, there'll be a run time error.
If you inadvertently connected the train controller cards in the wrong order, then the ring will be operational from train's and test_ring's perspective but you'll still see some strange behaviour as we continue with our tests below. It will seem that sometimes, the wrong point numbers are being changed and that sometimes, the software reports that engines are located where they are not. Keep this in mind as we proceed.
Assuming that you’ve addressed and corrected any troubles to date, we can look at some of the basic command line options for the train programme. Enter 'train -?' and you'll see a full list of command line options displayed.
The first option is the '-l' flag. This tells the train programme to save all of the run time messages into a log file. Some run time messages are always displayed to the screen, but most run time messages will only ever be output if you turn on file logging. By default, most run time messages will not be compiled into the train programme and in order to activate them, you need to turn on one or more of the debugging flags within config.h. Hopefully, you only need to do this if you want to modify the code or you think you've discovered a bug and you want to see what's going on.
The '-r' option is always used on its own and is useful if for some reason, you need to reset the state of all of bits in the output shift registers to 0. For example, if you killed the train programme by typing <CTRL-C>, then all your locomotives may be still moving but out of computer control. Typing 'train -r' will quickly bring them to a halt.
The next options are the built in tests. The tests are intended to help you check the basic card functions and the cabling between the train controller card and your train set layout. These tests differ from the diagnostics performed by test_ring because they specifically exercise the functionality of different parts of the train controller card.
When you run the ring test, you should be able to observe the power supplies changing, relays clicking and the point motors being thrown one at a time.
The test is systematically shifting a 'mostly zeros pattern' onto the ring with just one of the bits set to '1' at a time - firstly bit 1, then bit 2, then bit 3 and so on until the final bit in your ring has been set. Refer to controllerN.h to check the order of output bits so that you know what behaviour to expect.
You can use a logic probe to monitor the outputs of the 74HC595s but most of the time, you should simply look or listen for either a relay or point motor click. Note that the points will not click consistently because this particular ring test does not pay attention to the recharge cycle time for the point motor supplies.
There is a second variant of this bit shifting test:
Instead of setting a single bit to '1', this variation sets every third bit to '1' and slides this pattern through the ring. When running this test, you should hear lots of relays clicking all of the time and if you peer closely at your train controller card, you should easily be able to spot your relays changing state by their movement. Like the previous test, this test will not correctly fire the points either because the monster capacitor (C16) will not be given a chance to recharge. In fact, the heat sink on the point motor supply regulator will get quite warm during both of these tests.
If you're happy with your relays, this next test is specifically designed to check the point motors:
One, two, three or more (depending upon how many controller cards you have) sets of points at a time will be set and then reset a number of times. It should be obvious from the noise which point motors are working and which are not. The test will start with point number 1 and systematically test all sets of points through to the highest numbered point in your layout.
The point test is very useful to check to see if all your sets of points can be reliably fired in each of their directions. You should run the points test for a dozen or more cycles and confirm that all points reliably change. If you specifically want to focus on a particular set of points, you can use the command:
for example, will repeatedly test just point number 5.
Now, you may want to confirm that all of your track blocks are wired correctly and that the connections between the individual tracks and the controller card are intact. Two variations of the test are available, a fast version and a slower version. The commands to use are:
This example specifically tests track block number 5 to make sure that it's been connected to the right train controller card and the connection is good. The '-ta' test is the fast version and the '-tb' test is the slower version.
If you use a voltmeter across the two tracks and run either of these tests, you should see that the voltage changes from about 6 Volt to 12 Volt and then again with a polarity reversal.
To simplify the acrobatics of leaning over a layout to use a voltmeter to measure voltage, I constructed a simple jig consisting of two light globes each with a series diode facing in the opposite direction. By using a jig, I didn't need to hold voltmeter probes onto the tracks at the same time as typing on my computer 3 metres away. Plus the advantage of using light globes instead of a voltmeter is that they present a more realistic load to the power supplies.
When you run the block test and place the jig onto the tracks, it's easy to spot what is going on. If neither light globe illuminates, you've probably got a wiring problem between the track and the controller card. If only one lights up, you may have a relay wiring problem on the train controller card itself. If the light globes only show half bright or full bright, there's a problem with one of the programmable supplies.
If you're unsure whether your programmable power supplies are working, use the test:
(which specifically exercises power source 2.) Starting from nominal stand still (0 Volt), the train programme will slowly ramp up the nominal speed of the power controller up to maximum speed and then slowly ramp it back down again to zero. A light globe or an analogue voltmeter are the best ways to monitor this test. The globe will slowly fade towards maximum brightness and then fade back towards darkness.
At last! We can run some trains
Phew! It's been a long time coming but if you've made it this far, now is the time you can eventually start to control some real trains!
Back in the first article, I showed you an example of a route file called route0.txt. When you downloaded the software source code, you should have received this file too. The purpose of the route file is for you to define the route of a train around your layout. The route can be as short or as long as you like because it can have as few as two steps or literally millions (if you can type that many).
So now that you want to run a train on your layout, you'll have to create yourself a route file too - the example route file is unlikely to work on your layout because the plan of your layout is likely to be very different from mine. To create a route file of your own, study your numbered layout plan and list all the block numbers you'd like your train to visit in the correct order. Make sure the last number in the route file is a block which is adjacent to the first block number in the route file.
Like all software, your route file could contain bugs which the train programme will discover and complain about during run time. Route bugs could be introduced because the sequence of block numbers in your route file aren't actually adjacent to each other in your layout plan or because the last block in your route file is not adjacent to the first block (wrap around).
For your first real operating session, why not keep it simple. Take one of your favourite locomotives and place it upon your layout somewhere along the route you just created. The way the example train programme has been written, it is best to try to place the locomotive at the logical 'centre' of any of the blocks on your route rather than above a block boundary. The reason is that at software initialisation time, the state of each set of points is unknown and the software can't tell if the locomotive is above a set of point rails or whether it is clear. If the wheels of your locomotive are on point rails that are switched the wrong way, the train programme will throw the points and your train's inertia is likely to cause it to derail.
When you run the example train programme this time, don't type any run time options. It will locate and count all the locomotives it finds. If this doesn't work, perhaps your block detectors or the input ring is not functional - but these are problems that you should already have discovered.
When 'train' reports the occupied blocks, it will ask what route file you want to use: enter '0' to use route file 0, '1' to use route file 1 and so on. In total, you can have 100 route files numbered route00.txt to route99.txt.
In a few seconds hopefully, a set of run time commands will be displayed, then your locomotive will gracefully pick up speed, your points will be set in advance as it moves and it will travel unassisted around your train set until the cows come home. You deserve a cold one at this stage. And I'll bet it will taste good!
Alas, the chances are that you will have specified the wrong polarities for one or more blocks in the config.h file, or you will have got the OPEN and CLOSED settings back to front for some of the points. You'd better put that beer back into the fridge if this is the case and start debugging.
When there's polarity problems with the blocks, you're almost certainly going to see the over current protection on one of your train controller cards trip. Work it out and reset your controller card by pressing the power overload reset button and then start again. With patience and a methodical approach, I'm sure that you will yet see that locomotive cruising your layout of its own accord before you retire for the night.
So now you've got a computer controlled train set and your train is busy circulating. How can you stop it? You could just throw the power switch, but this method is ugly and is unlikely to impress your friends. You could also type <CTRL>-C on your PC, but the train will continue to roll until it trips the power controller's over current protection circuit when a it makes a short at an incorrectly set block transition.
The most elegant way of shutting down the train set is to enter 's' (to Stop all trains) and you'll see the locomotive gracefully slow to a halt like a real one!
By now, you'll be starting to get the hang of it. Place a second train onto your layout at a different location and run the train programme again. If you specify the same route file for both locomotives, they will follow each other around and around but for variation, you could define a different route and watch the action and try to predict their movements.
You'll soon learn what types of deadlock the example train control programme can manage and what types it gives up on by seeing when things go awry and when they go OK. Next month, we'll look at the way the software works so that you can start to think about resolving some of these for your particular layout.
Running carriages behind your locomotives
At some stage soon, you're going to think about connecting a carriage (or several) to you train. If you've used your carriages on block controlled train layouts before, the chances are that you've already installed "resistance axles" at each end of your carriages. But if you’re just using carriages "out of the box", then as I mentioned way back in the early part of this series, you're going to have to modify some of the fleet so that the carriages present a small electrical load to the block detectors.
The reason for this requirement is that when you want to run multiple trains on your layout, it is important that the control software knows when the *rear* of each train leaves the last block. The software will not allow another train to enter a block which is still occupied and if you don't have resistance axles on some of your carriages, then you're going to see some interesting and undesirable manoeuvres.
Installing resistance axles is not hard but it could take a while if you own a lot of carriages. If possible, you should modify all the carriages in your fleet to include a resistance across the two outermost axles. But I know you're not going to modify them all, so as a minimum, at least the rear axle in the caboose (or last carriage) on each train should have a resistance fitted and if you're going to run long trains, some of the middle carriages also.

Figure 2 Adding resistance to an axle
One method for adding a resistance across an axle is shown in Figure 2 and assumes that you've fitted metallic wheels already. You'll also need some small resistors with a value between about 10k and 20k, some cyanoacrylate (super) glue and a conductive pen. For the resistors, you could choose either a tiny surface mount device or an axial resistor rated at 0.125 Watt or smaller. Conductive pens are not common items in the hobbyist tool kit but some hobby shops, PCB suppliers and automotive repair shops stock them. Conductive pens are used to repair broken traces in PCBs and rear window demisters and are great to use for running power within rolling stock and fixed models too ("painting" on the wires).
If your wheel sets have metallic axles as well as two metallic wheels, you'll need to use a blob of paint or nail polish to insulate one side of the axle before gluing the resistor and drawing the conductive traces. It's also a good idea to take a roto tool with a wire disc and polish the rims and the insides of the wheels before you do any gluing or painting. Many metallic wheel sets have non conductive lacquers and paints on them that will need to be removed.
Getting your points to work reliably
I have one final tip for you to consider if you haven’t already commenced construction. At every set of points (or turnout), the point rails (the two rail sections which can move) will change their polarity depending upon the direction to which the turnout is switched. That is, the two point rails are designed to be electrically shorted to each other and their polarity will change depending on whether they are switched to one outside ("stock") rail or the other. You'll need to grab a set of points and look at the way they move to see what I mean. Many model points on the market rely upon physical contact between the point rails and stock rails in order to pass power. In this sense, turnouts are actually real electrical switches and behave just like a standard SPDT device.
Because of their reliance on physical contact and the relatively dirty environment of a train set left in the open for many months or years, you should not be surprised if you experience electrical problems with some of your sets of points. There are many reasons that the point rail may occasionally make a poor contact with the stock rail. Perhaps the inside of the stock rail or the outside of the point rail will become grimy and there will be no electrical conductivity. Perhaps a grain of sand or ballast or dust will prevent the point rail from making contact by the merest fraction of a millimetre. Perhaps the tension in the points’ spring will not be sufficient to reliably hold the point rail against the stock rail as trains traverse it. All these reasons lead to one thing: operational problems.
Whether you’re using computer control or not, unreliable operation can become very frustrating and take away your enjoyment in watching your trains. In my own layout, I discovered all of these problems and in desperation, tried an experiment to see if I could improve performance.
Figure 3 Mounting an SPDT switch to a points solenoid
I retrofitted a mechanical SPDT slide switch (as shown in Figure 3) beneath the train table and arranged it so that it would be toggled by the side to side motion of the point motor solenoid. I connected the centre pole of the switch to the frog / point rails and the two outer poles to the two powered stock rails. The improvement was so dramatic, I retrofitted every other set of points in the layout. If you’re yet to commence your layout construction, I’d highly recommend that you save yourself the frustration of trying to retrofit and hide the wiring and plan this enhancement from the outset. Some point manufacturers offer add-on switches which are custom made for their points but if you decide to use a standard SPDT switch as I did, make sure you find one which has about the same travel as your point motor solenoid so that the switch doesn't interfere with the operation of the points.
If this is gobbledegook to you, check out
http://www.WiringForDCC.com/switches.htm or surf the web and find one of the many sites that describes how a set of points is wired and what to watch for. In any case, I strongly urge you to consider fitting switches to all of your sets of points.The guarantee
Finally, we've reached the end of the practical part of this series. At this stage in the project, I feel as though I owe all constructors who have faithfully followed in my footsteps a guarantee.
I, Stefan Keller-Tuberg, guarantee that the example train controller software contains undiscovered bugs.
Yep, that's right! All users of computers realise that programmes always contain bugs, some of which are almost impossible to detect and remove. While I've diligently attempted to correct the errors in the example software, the simple fact that your layout will be different from mine, that your trains will move at different speeds to mine and that your computer is configured differently than mine will make it likely that some problems, hopefully minor, will remain. I do however pledge that the software has been working fine on my layout for more than a year and so it is probable that it will also work reasonably for you too.
In the event that you encounter something which doesn't seem quite right and begs correction or if you're just plain curious and restless to delve into the code and add your own features, you'll need to wait until the next and final article. The last instalment in this series will explore the innards of the train programme and will arm you with a little more information with which to help you try to find the cause of the difficulty or help you understand how best to customise your own features. Until then, pleasant compiling and train controlling.
Stefan Keller-Tuberg BE (Hons) MEM
Stefan Keller-Tuberg is a professional engineer with an honours degree in Electrical Engineering from the University of New South Wales and a masters degree in Engineering Management from the University of Technology, Sydney. He and his family are presently living in the United States where Stefan works in the telecommunications industry planning service architectures and product evolutions for high speed xDSL and Optical Internet access products. They are enjoying life in the USA but are looking forward to their return to Australia some time in the coming year.
Copyright 2001. Stefan Keller-Tuberg.