
"It is a truth universally acknowledged that a single man in possession of a good fortune must be in want of a train." (Sort of from "Pride And Prejudice". With sincere apologies to the ghost of Jane Austen and to all of the very many non male train hobbyists)
By now, most readers will be familiar with this series of articles in which I am explaining the steps I took to design and build a computer based controller for my train set. This is the fourth article and this month, we'll finish looking at the circuit for the basic train controller and explore the PC parallel port interface.
Although the application I had intended for the design is the control of a model train set, you will see this month that from the hardware perspective, there is nothing about the computer interface which would force this circuit to "only control trains". So if you have ever felt an interest in using your computer to control some complex application, or even if you just wondered whether it would be possible, read on! It is likely that with not much reinvention, you could use this design and the example control software as the basis of your own adaptation to fulfil a broad range of other computer control tasks.
At the conclusion of the previous article, we had been discussing the use of ULN2003 ICs for the point motor drivers but because of the very low resistance of a typical point motor coil, the ULN2003 IC cannot supply the drive current directly. Therefore, the train controller circuit uses a secondary power transistor and a handful of other components (refer to Figure 1) to overcome this limitation.
Figure 1 Secondary point motor driver
The base resistor (R221 – R240) of the transistor (T201 – T220) is only 100 Ohm which with the 24 Volt Points Supply, results in a relatively high base current. The high base drive is necessary because the low resistance of the point solenoids require a significant current in order to operate them satisfactorily. In the worst case, the current gain of the MJE2955T is not tremendous and could be as low as 20. If the value of the base resistor was much greater than 100 Ohm, the base current would be reduced and low gain transistors would be unable to reliably fire the point motors.
Despite the high instantaneous power dissipation in R221 - R240 (more than 5 Watt), we are able to use a low wattage value because the points supply uses a capacitive discharge power source. By using a capacitor, we ensure a high initial current to get the point solenoid moving which quickly diminishes to almost nothing as the point solenoid is slamming into the opposite side. The base current will therefore follow this profile and the base resistor would be spared from incineration.
Now would be a good time to think about the voltage (which produces the current) that needs to be used to throw a point motor. In general, solenoid type point motors are rated intermittently at around 16 Volt AC. Some simple experimentation will show that in a layout with many different point motors, the majority will be reliably "kickable" with a voltage of around 12 Volt DC. However, depending on the "stickiness" of the point rails in each particular set of points, it is also likely that there will be at least a few points which will not reliably change using only 12 Volt. For the sake of these few sets of points, a larger point motor driving voltage should be used.
The point motor supply presented in Figure 2 supplies a nominal 22 Volt time limited pulse and I have found this to reliably throw even my most stubborn points. Actually, it's mainly the total energy impulse which matters and this is a product of the voltage and capacitance - more capacitance or more voltage means more energy.
If you are wondering why the ULN2003s (shown in last month's article) are required to mediate between the HC595s and the secondary transistors (T201 - T220), the answer lies in the fact that the CMOS outputs of the HC595s are not able to provide sufficient output drive to switch the transistors. In order for the circuit to work, the current from the HC595 outputs needs to be amplified using an intermediate transistor. The ULN2003 is a low cost, convenient and integrated way of providing a large number of intermediate transistors, resistors and inductive kickback protection in a small footprint.
Rather than to mount all of these secondary point motor control components on the card along with the rest of the circuit, I have chosen to locate them directly on or adjacent to each particular point motor. The advantages of this are twofold. Because the card is densely populated with components as it is, mounting the secondary point motor drivers off board also conserves board real estate. Also, the peak point motor current can be almost 10 Amp and so if the drive transistors would be mounted on the main card, many lengths of thick gauge wire would be required between the card and the point solenoids - which would become unruly to manage.
In fact the heavy point motor current surge only flows between C16 and the points and it is better to mount C16 as close as possible to the point motors both because of the significant peak current and because of its large physical size (which would make it difficult to mount on a card).
In practice, mounting these components off card is quite straightforward. The transistor is in a TO-220 case which has a convenient hole which can be fastened to the underside of a plywood layout base with a self tapping screw! Don't worry if you have a foam layout base, some foam friendly adhesive such as low temperature hot glue should do the trick! (Don't worry too much about heat from the transistors, they don't get hot.) With the transistor anchored to the layout base, the other small components can be directly soldered to it and I'll provide some more detailed construction suggestions next month.
Now it’s time to examine the voltage rectification section of the circuit which is shown in Figure 2.
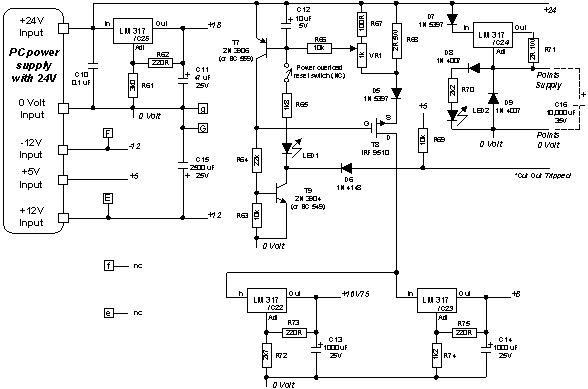
Figure 2 Voltage regulators and cut out circuit
The recommended source of power for this project is from a PC power supply which includes a 24 Volt 2 Amp output. Not all PC power supplies have 24 Volt 2 Amp outputs so you should check this before you purchase one. Using a ready built PC switch mode supply is still likely to be significantly less expensive than purchasing a separate transformer, case and rectifying and regulating all the various rails. If you’re persistent, you’ll find a PC switch mode supply for less than $20 - perhaps you'll even get the PC case thrown in for free!
Some of the voltages used by the power controller card are already available from the PC power supply (+5, +12, +24, -12) and nothing further needs to be done with regard to these rails. For the other rails (+16V75, +18 and +8), additional regulation and current trip is required as shown in the circuit.
The current trip circuit has been designed to quickly remove power from the track in the case of a short circuit or some other form of overload. In a model train layout, a short circuit is a more frequent than desired event. Rather than limit the current to some maximum value (and potentially burn or melt something before you discover the problem) this design incorporated the philosophy that power should be completely removed in the case of an overload and that human intervention should be the only way of restoring operation. In this way, you can always be sure of protecting your many hours of investment in layout construction and your dollars in equipment.
The two voltages supplied to the PWM and DC controllers (+16V75 and +8) are each sourced from the current trip circuit. VR1, R67 and R68 lie within the current path as does the power MOSFET T8. Normally, T8 is biased on by R63 and R64. As current rises, the voltages across VR1, R67 and R68 also start to rise and the Base of T7 starts to become biased. When about 0.7 Volt is present at the base of T7, it turns on. Capacitor C12 adds a little time constant to accommodate momentary current surges without tripping the cut out but if the current surge remains, MOSFET T8 is turned off and the current is shut down. As T8 is shut down, transistor T9 is turned on by the same action which illuminates the LED. This clamps T7 in the on state, in turn latching the MOSFET off.
The only way to reinstate power in this design is for a human to press and momentarily hold the "big red" reset button, or whatever colour you choose. The intention is that the cut out current level needs to be set to a value which is really only ever experienced when there is a short in your particular layout. That is, depending on the characteristics of your locomotives and your layout, you will need to find a sensible setting for VR1.
You should be aware that the minimum cut out current will be at around 0.25 Amp when VR1 is set to its maximum resistance. By reducing VR1’s resistance, you can effectively increase the cut out level to well beyond the capabilities of the power supply – so VR1 will usually be set at a point somewhere in its early to mid range. If it is set too late in its range, the current trip circuit will never be activated - so be sure to set it carefully.
The instantaneous state of the cut out circuit is available to the PC at the same time as the PC polls the state of all the block detection inputs. However, by the time the PC has discovered that the power cut out has tripped, the power will already have been removed from the track. If your layout includes just a single train controller card, the PC would normally be unable to do anything useful with the power loss information other than warn the operator. If however your layout has more than one train controller circuit, when one of the train controllers overloads, the others will still be operating and the PC could gracefully set the voltages on the active power controllers to zero before their locomotives career into the domain of the tripped controller.
The points supply is a type of current regulated supply. With the exception of some of the high end "slow motion" point controllers, most "point motors" don’t actually contain a motor, only a magnetic coil. As mentioned previously, the characteristics of the coils in point motors are usually such that if you supplied full continuous voltage to the coil, the solenoid would heat up sufficiently to destroy itself and its housing and possibly set your baseboard on fire! Certainly, you’d be at least starting to smell the point motor within about 20 seconds of supplying it with full voltage.
In an environment where a computer is going to be controlling point motor solenoids, one should be circumspect about ones ability to write bug free software and simply acknowledge that at times, the unthinkable might happen. In the case of the having a computer activate a solenoid which by design, will combust if powered on for more than a very short time, you should consider it wise to include some sort of fail safe current limiter into the design. I'm sure you understand exactly what I mean if you've ever written software to control real world things.
The points supply in this circuit is very simple and consists of an constant current power source and capacitive storage based around IC24, R71 and C16. The idea behind this design is that the capacitor holds enough charge to send a high current to a point motor for a very short time. The capacitor is charged from the constant current source in a relatively short time and the magnitude of current is low enough so that a point motor coil will not be damaged if it is accidentally left connected.
To regulate the current, IC24 will adjust its apparent impedance so that it drops about 20 Volt between its input and output pins so be sure to ensure that it is mounted on an efficient heat sink because it will be dissipating around 12 Watt under this condition. When continuous current is flowing, you will notice that R71 and the point motor solenoid will become marginally warm and IC24 will become hot but even if the charging current is left to flow indefinitely through the solenoid, none of these components should be damaged – which is the whole point of this part of the circuit.
Although the point motor circuit I have shown is a constant current type (using the LM317 voltage regulator in a current regulation mode), it would also have been possible to use a simple R/C combination. The advantage of using a constant current supply for recharging the capacitor is that for the same peak operating current, the time taken to recharge the capacitor is significantly reduced when compared with the recharge cycle for an R/C point motor supply.
After the capacitor has been discharged into a set (or sets) of points, a charging current will still flow through IC24 and R71 and into the point motor coil(s). With the specified value for R71, the current will be regulated to around 600 mA. If the software does not turn off the point motor drivers after the points have been fired, the capacitor will not be permitted to recharge and this current will pass through both R71 and the point motor coils.
The capacitance rating for C16 is best determined by trial and error for your particular solenoids and I have seen many different designs published using a value of 2500 uF. If you want more than one set of points to be throwable at the same time or if you have some mechanically "sticky" points on your layout which may need some extra kick, increase the size of the capacitor up to perhaps 10,000 uF.
In my layout, I have chosen to use an even larger value of capacitance because I happened to find a less expensive higher valued component. Whatever value you choose, it is clear that you will have more flexibility in changing the value of C16 than for almost any other component in the circuit. As a rule of thumb, I'd suggest that you choose a larger value rather than a smaller value but the final decision will of course be yours.
The normal method of using such a points supply is to follow a procedure. Firstly, you simultaneously throw as many sets of points as required by activating the required control bits in the output shift register chain. Approximately half a second should be allowed for the points to change their state. When switched, all sets of points must be disconnected from the points supply (by deactivating the output shift register bits) in order for C16 to recharge. The recharging takes around 90 ms for each 2500 uF of capacitance and the software will need to take this into consideration after it turns off all the point motor drivers. After C16 has recharged, another set or sets of points can then be "fired".
In total, the cycle of firing a point motor solenoid, disconnecting it and allowing C16 to recharge takes less than one second and so under software control, a number of different sets of points can be fired in rapid succession.
The last section of the circuit is shown in Figure 3.
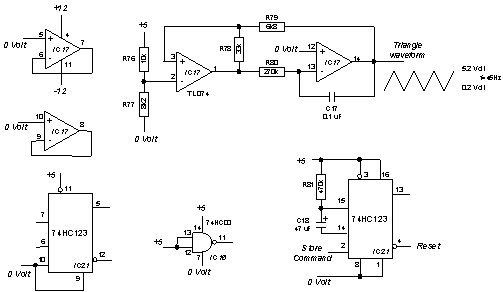
Figure 3 Triangle wave generator and miscellaneous gates
The triangle waveform which is used to drive the PWM generators is produced with IC17. It is an unusual variation for a triangle wave generator because the voltage levels for the triangle waveform need to vary between just above 0 Volt (minimum) to around 5 Volt (maximum) and the most common application for a triangle waveform generator of this type is to work symmetrically around 0 Volt.
The 0 Volt to 5 voltage swing is required so that the PWM comparator described last month can successfully compare the triangle wave with the D to A voltages from IC18 and IC20. The minimum triangle voltage needs to be marginally above 0 Volt so that it is possible to set PWM output to a DC zero level. Using the nominal component values shown, the base of the triangle voltage is around 0.2 Volt and the peak is around 5.2 Volt meaning the PWM voltage can be turned off by setting a zero value in the associated D to A converter and that setting a value of 15 results in a duty cycle of around 95%.
There are a number of ways in which a conventional op amp triangle wave generator can be modified to shift the output voltage. In this case, the shift has been achieved by adding a non zero voltage reference (R76, R77) at pin 2 of IC17 which is wired as a comparator. However, changing the voltage reference to this comparator also fundamentally changes the peak to peak operating voltages of the oscillator so be sure of yourself if you wish to change any of the component values in this part of the circuit.
As specified, the frequency of the triangle wave oscillator and therefore the PWM is approximately 45 Hz. The frequency is solely determined by the combination of R80 and C17 and increasing the value of either will reduce the operating frequency. To save you the bother of calculating or simulating the circuit, setting R80 to 120k produces approximately 100 Hz, 150k gives 80 Hz, 180k gives 65 Hz, 220k gives 55 Hz and 330k gives 35 Hz. Of course, you could always substitute a series combination of a lower valued resistor and a trimpot.
The only reason I can think of to vary the frequency from the nominal 45 Hz would be to get around any annoying resonances which you might uncover in one or more of your trains, but I would not normally expect anyone to discover a resonance at this frequency because it is so close to the nominal mains frequency and train manufacturers should have tested and fixed any resonance problems. Of course, you may wish to experiment with much higher frequency PWM to see how it performs for your layout but perhaps this is easiest to achieve by temporarily bridging a (say) 4k7 resistor across R80.
IC21 is a dual retriggerable monostable which in layman's terms, is a chip which generates voltage pulses that can be extended as often as desired. The point motor reset function described in the previous article is controlled by IC21 which in turn is controlled by the Store Command signal from the host computer. It works as follows:
When you power up your train controller card, the capacitor C18 will be discharged and the Reset output from IC21 will pulse low for a period determined by the time constant R81 * C18, the time it takes for C18 to charge. With the values selected, this time constant is about 15 seconds. So if your software hasn't initialised the output ring within 15 seconds of you applying power to the controller cards, the Reset output will become high and the 74HC595 devices controlling the point motors and selection relays will go into tri-state.
As soon as the software starts to control the train set, a Store Command pulse will reset IC21, which discharges C18 and turns off the Reset signal. For as long as the software is operating, IC21 will continually be being retriggered and the Reset signal will be held off. But if the software crashes or halts, C18 will eventually recharge (in 15 seconds), and the Reset signal will again be asserted.
IC24, the point motor regulator could get warm during the 15 seconds it takes for the Reset signal to trip, but at least it won't be held on indefinitely.
The parallel port adapter
The circuit for the PC’s parallel port adapter card is shown in Figure 4. In any implementation of a computer controlled train set, there will only ever be one parallel port adapter even though there could be many separate train controller cards. It is intended to be built on a separate card and located within 1 meter from the parallel port at the back of the host PC.
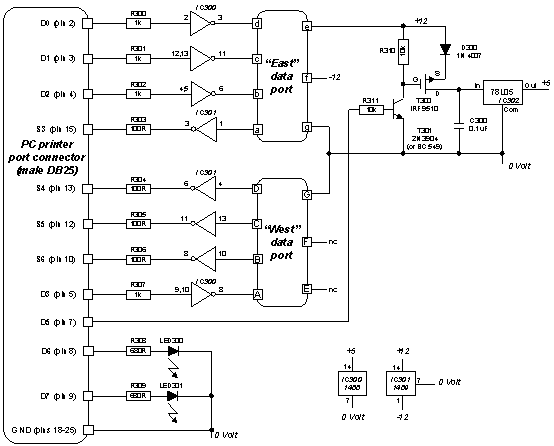
Figure 4 Parallel port adapter circuit
The parallel port drivers on older PCs used to be relatively robust but with modern day clones and increasing integration, it is a lot easier than you think to burn out one of the bits in the printer port. Therefore the parallel port adapter circuit has been designed to be "intrinsically safe" from the PC’s perspective, dumb wiring errors and shorts not withstanding.
The structure of the parallel port adapter is very straightforward. On one side, a series of wires connect to the parallel printer port of a PC. On the other side, two sets of wires head off towards the East and West legs of the control ring. The main part of the circuit in the middle is simply a pair of RS-232 level conversion chips.
Because the parallel port adapter is powered from voltages fed through the ring itself, there is a good chance that from time to time, the parallel port adapter will receive power before the PC is turned on. This means that some of the parallel port wires could be driven to +5 Volt even though the PC is not turned on.
A class of fault known as "latch up" can be triggered by driving an IC’s input pins to +5 Volt before that IC receives power on its power supply pins. Basically, by driving the inputs to the IC while the power is off, a small current will flow and the input transistors within the IC could be biased in such a way as they start to behave as if they were ON. When the power is really applied to the IC in question, the input gates "latch up" and behave as if they were a dead short between +5 Volt and ground – causing the input transistors to quickly get hot and burn out and therefore destroy the device.
The best way to avoid latch up is to avoid driving an IC’s inputs before power is applied. In order for a voltage to be driven onto the PC’s parallel port inputs, IC 301 must be powered on and in order for IC 301 to be powered on, the +5 Volt regulator IC302 must be turned on. In the parallel port adapter circuit, transistors T300 and T301 fulfil this requirement by behaving as a software programmable power switch which can only turn on if D5 (data bit 5) of the parallel port is driven high. Because D5 could only be driven high if the PC was turned on and the parallel port interface IC powered up, the latch up scenario is intrinsically avoided.
Latch up of the RS-232 drivers which might occur if the PC was powered on before the RS-232 driver chips is not a problem when using the ICs that have been specified.
Looking at the components used in the both the train controller and port adapter circuits (the list was included with the previous article), you will notice that although the number of individual parts is high, many will probably be familiar to you and you might even already have a few hidden in the bottom of your junk box. Most of the ICs should be straightforward to source from the regular outlets and any of the transistors and diodes can be easily substituted using devices with similar characteristics without affecting circuit operation. If for some reason you cannot find any good-ol’ 1488 or 1489s, you can substitute MAX232s (which operate from a single +5V supply rather than the +/- 12V used by the 1488) or a single MAX208 (which also operates from a single +5V supply).
I would strongly recommend the use of IC sockets for all of the DIL ICs. Although not strictly necessary, you may save yourself hours or weeks of woe and frustration if you spend a little more and socket as much as possible. The chances of frying an IC some time in the life of the controller and interface cards is reasonable given the harsh electrical environment of a train set. Using sockets throughout also helps you when it comes to first applying power to your controller cards and testing them.
Finally, I have not specifically shown power supply bypass capacitors in any of the circuit diagrams and suggest that you add them to your own circuits as appropriate. Power supply bypass capacitors are included in circuits for a number of reasons relating to the inductance of the on-card power supply wiring. Digital ICs usually draw a surge of current when outputs change state and 0.1 uF bypass capacitors wired directly (as closely as possible) to the power supply pins of the IC assist by helping keep the power supply to the IC from drooping. Drooping can cause ICs to erroneously change state or can introduce noise into analogue signals such as the D to A outputs from ICs 18 and 20.
For the additional cost of good quality power supply bypass capacitors, it is probably best to include a separate bypass capacitor for each and every DIL IC. The train controller circuit will probably still work without them, but depending on your circuit layout technique and your knowledge of wire routing, the chances are that you will certainly need at least a few. It is better to avoid the potential hassle and debugging and just include them from the start.
Again, we have reached the end of the instalment and must sign off for another month. In the next article, I’ll provide some tips on construction (if you can wait that long) and in the coming months, present a method for powering and testing the train controller and describe the first of the example software sources.
Stefan Keller-Tuberg BE (Hons) MEM
Stefan Keller-Tuberg is a professional engineer with an honours degree in Electrical Engineering from the University of New South Wales and a masters degree in Engineering Management from the University of Technology, Sydney. He and his family are presently living in the United States where Stefan works in the telecommunications industry planning service architectures and product evolutions for high speed xDSL and Optical Internet access products. They are enjoying life in the USA but are looking forward to their return to Australia some time in the coming year.
Copyright 2001. Stefan Keller-Tuberg.